So this weekend was the 2010 Midwest Fiber & Folk Art Fair. This is only about the 4th year, and it’s been a little uneven, as well as moved venues pretty much every year. This year it was at the Lake County Fairgrounds, in Libertyville and/or Grayslake, which are some of those suburbs that I know exist but I couldn’t point to them on a map… or for that record, couldn’t have told you they were in Lake County, because that is a degree of precision far beyond my suburb navigation skills. You know. These are the far suburbs. The ones that are basically farms and only get to be called “suburbs” because Metra has stops there. I mean, this was driving farther out there than, like, The Fold, which says something about my level of commitment that I was willing to drive 45 miles out there not once, but twice. Once on a Friday. In traffic. Be suitably awed by that — I certainly am.
I signed up for three workshops this year, which was a first — previously I’ve just gone for the shopping. On Friday, I took a class called “Intarsia without fear.” For you non-knitters, intarsia is when you knit with different colors of yarn to make patterns. It means that instead of knitting a sweater with one yarn, you have to wrestle a bunch of them. Each little block of color has its own yarn. If you’re knitting flowers, on a solid background, even each distinct area of the solid background has its own yarn, because you can’t just string the yarn around behind the flowers. So if you have six flowers, you’ll have at least five separate yarns for the background in between the flowers, on top of at least six yarns for the flowers. It’s… messy. I tried it once, on my own, then had a yarny mess and ran screaming. So, that’s why I signed up for that class, where she promised to teach us to knit intarsia but was up-front and admitted that she couldn’t teach us to love intarsia. I don’t think I do love intarsia, but the class was fun, and I learned a new technique, so I enjoyed it. There were still yarny messes happening, but I did, technically, successfully knit intarsia. Yay me! (See that flower? where the center bit is? There were five separate yarns in play there – one for each background piece, one for the middle, and two for each side of the flower around the middle. Look at the flower, then look at the whole pile of ends-of-yarn on the side. I told you it was messy!)
Saturday morning I took a class called “Drumcarding for Color and Texture.” This was a little bit of a letdown, because there was a fair amount of basic introductory drumcarding (here is where you oil it, this is how you peel the batt off), and I didn’t really expect that — I thought we were jumping right in and doing things like color theory, finding complementary colors to blend together, talking about how to choose fibers that play nicely together, different effects, etc. I guess I kind of figure that if you’re the kind of person who owns a drumcarder, a $500+ piece of specialized fiber processing equipment, you probably read the owner’s manual on your own. And that intro stuff ate a fair chunk of the 3 hour class. We really only explored one technique per se, which was creating a batt with three distinct colors by carding in layers. The rest of the info, honestly, I already had from either learning on my own, or from last year’s Camp Pluckyfluff Chicago. But I had fun playing around with the carder and seeing what other people came up with, so it wasn’t like it was a total waste of time.
These are the batts that I did in class:
1 – basic carding: one plain white Coopsworth wool batt predrafted and balled, and one plain white Coopsworth and grey mohair batt predrafted and balled. So boring I’m not even posting the picture.
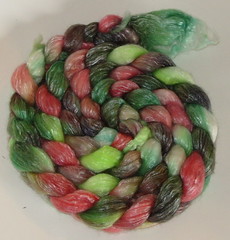
2 – Seashore batt. This is a nice fat batt, probably at least 1.5 if not 2 oz, of wool in blues and greens that I blended up somewhat, then carded together with some copper-colored Coopsworth, a little white tussah silk, and some pink mohair. I really like how this one turned out, which is nice because it took me like 30 minutes to create it.

3 – Tri-color batt. This was the batt I made by layering carded turquoise, carded purple, and carded pink Coopsworth together, then pre-drafting it into a roving. The colors are a little bit 80s, but it could turn out interesting once I spin it.

4 – Chocolate brown alpaca with random bits of shocking red and deep slate blue mohair. This one I also really, really like, and am looking forward to seeing how it spins up (though the mohair was a little pinkier than it looked initially, rather than the red I was really shooting for).

And Saturday afternoon, I took Franklin Habit‘s lace edgings class. This was a particularly great class, and really enjoyable. He taught three methods for edging — sewn-on, knitted-on, and simultaneously knit. Since I am a reluctant sewer, the idea of knitting separate edgings has not been my favorite notion ever, but it was not so bad (at least, for the four inches of swatch and edging we did for class, ha). I really liked the project we did for the “simultaneous” edging, called the Stupid Little Snowflake: called so because it was a “shawl” with a center piece of about three stitches by six rows, with a point on each side and corner, so it was an eight-pointed star, sort of. The handout notes that it is suitable for gifting to “someone that you don’t care about very much.” Ha. It was basically an Orenburg technique, and it was definitely a little fiddly, but it wasn’t that hard, so I almost got my whole snowflake done in the half hour or so of class we had for it. This class really could have benefited from being more than three hours, just because there was way more that we could have done if only we’d had the time. (Whither my DeLorean!) So that class was well worth the price of admission, and I’d totally take another of his lace classes if I get a chance.
Of course I also went shopping, since that is the point of fiber fests, after all. I didn’t buy a whole lot of stuff, on account of my house still being full of plenty of fiber, but I did pick up a couple of extra bobbins for my Lendrum, and some fiber. By “some,” I mean slightly over two and a quarter pounds. Don’t judge me!
I picked up two 4 oz bags of raw alpaca fleece. It’s in good condition, but has a fair amount of VM (“vegetable matter” – straw, hay, etc) in it. I expect that’ll mostly come out when carding and spinning it, it’s not that much. The staple length is about two, two and a half inches or so. It is soft and cosy and if you were sleeping on a pile of it, I imagine it’d be like sleeping on a cloud. Alpaca from “Rosie,” left, and “Ariel,” right.


From Cloudlover, I got this 4.45 ounce merino/tencel top. The colorway is “Summer Orchard,” but it reminded me of strawberries. So it had to come home with me. Mmm, strawberries.
I also picked up two 4 oz 100% bamboo rovings from Fiberlady.com. Chocolate Cherries, left, and Fiesta (aka “ZOMG SHINY RAINBOW I NEED THIS NAO”), right:


Two hand-painted 4 oz rovings from Sheepish Creations. Rainbow polwarth, left, and swirl BFL, right.


And I picked up two 4-oz handpainted CVM Romney rovings from Sheepy Hollow Yarns, so I can probably make a pretty good sized project from this one:

I also picked up a grab-bag of what I’m calling “carder bait” — tiny bits of leftover wool roving in a whole bunch of different colors — from the Illinois Green Pastures Co-Op. No pics, though, because… well, because I’m lazy, mostly. You’ll see it sooner or later, when I card it up into more interesting things, though, so don’t fret. (Besides. A 7 gram piece of roving is not honestly all that interesting, even when you have 35 of them in one giant ziploc bag.)
Last I’ll just post this, which is a picture of the light tent I built a couple months ago, and used to take all these pictures:

It’s not all that impressive, but I like taking pictures of things on a white background. I need better lights, and I need to figure out how to use my camera — with it left on auto, sometimes it decided to use the flash and sometimes it decided not to, and there was a marked difference in the results. (Compare the two Sheepish Creations rovings above — nothing was different there except the actual rovings, but for the second, the camera’s flash went off, and for the first, it didn’t.) I think it was something like, the amount of artificial + natural (morning daylight) light in the room sometimes fooled the camera into thinking it didn’t need any more light, but it really did. On some of the photos, I had to edit them for temperature, exposure length, etc. after the fact. I am basically happy with the color reproduction in the final photos, but I would like to do without those dim, greyish backgrounds. Maybe if I had a colorcard for real white balance, and was doing my editing in Photoshop I could get even better results – but Snow Leopard broke my Photoshop and I’m too bitter to pay Adobe’s prices for a newer version, so cheezy iPhoto editing it is, for now, anyways. In a photo near the end of the shoot I was playing with the camera settings (i.e., I turned off ‘auto’ for the first time ever other than when the switch got bumped by accident) and I think I got a better result that way even with the lights as they were, so I just have to remember that for the future. But I was too lazy to go retake photos of all the stuff I’d already snapped, edited, and uploaded, so I’ll have to live with those greyish backgrounds forever. Or, you know, I could just spin the fiber and then take new shiny pretty photos for “after.” I think that is what I shall do!